Table of Contents
Ever looked at those intricate henna designs and thought, "Wow, I wish I could do that?" Well, guess what? You totally can! Especially when we're talking about something as sweet and simple as easy henna heart designs. Forget those complicated patterns for now; we're diving into the world of cute, achievable henna art that even your ten-year-old self could handle. This article is your friendly guide to creating beautiful heart designs, no fancy art skills required. We'll start by exploring why hearts are an awesome starting point for henna newbies, then we'll get into a step-by-step process that's so easy, you'll be sketching hearts on everything. Finally, we'll spice things up with some creative ideas to make your heart designs unique. So, grab your henna cone, or even just a pen and paper, and let's get started. Get ready to unleash your inner artist and create some seriously lovely easy henna heart designs. It's going to be fun, I promise!
Why Easy Henna Heart Designs Are Perfect for Beginners
Why Easy Henna Heart Designs Are Perfect for Beginners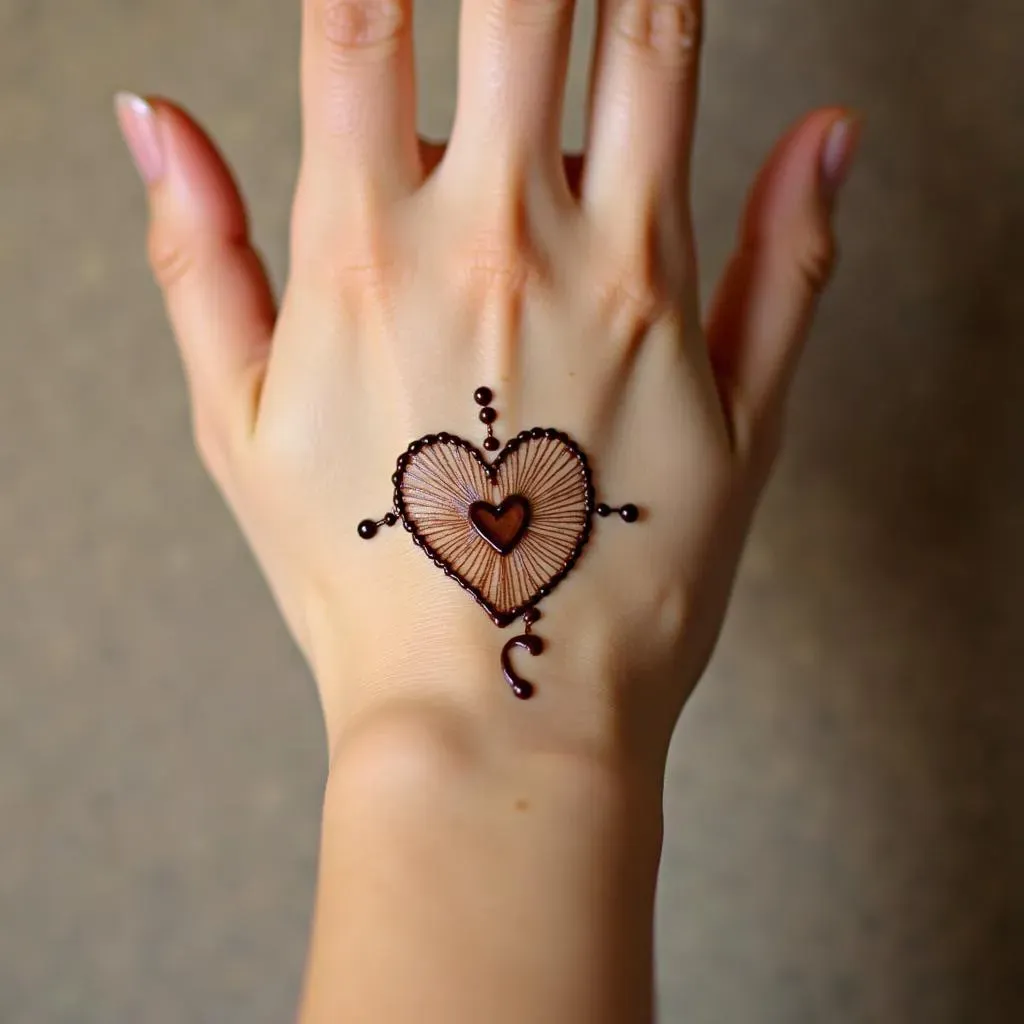
Simple Shapes, Big Wins
Let's be real, starting anything new can feel a bit intimidating, right? But here's the thing about hearts: they're basically just two curves meeting at a point. That's it! No crazy swirls, no complicated patterns. This simplicity makes them absolutely perfect for beginners dipping their toes into the world of henna. You're not wrestling with complex shapes, so you can focus on getting the hang of the henna paste and cone control. Think of it as learning to ride a bike with training wheels – you're building confidence and skills without getting overwhelmed.
Plus, because hearts are so simple, you get instant gratification. You’ll see your design come to life quickly, which is a big motivator when you’re just starting out. It's like, "Hey, I can actually do this!" and that feeling is super important to keep you going.
Building Your Henna Foundation
Easy henna heart designs aren't just about drawing hearts; they're about building a foundation for all your future henna adventures. When you practice hearts, you're mastering essential techniques like applying even pressure to the cone, controlling the flow of henna paste, and creating consistent lines. These are the building blocks for any henna design, no matter how complex. It's like learning your ABCs before writing a novel – you’ve got to start with the basics.
And the best part? You can experiment! Try different sizes, different angles, different types of curves. Each heart you draw is a chance to refine your technique and figure out what works best for you. It’s not about perfection; it’s about practice and progress.
Skill | How Hearts Help |
|---|---|
Cone Control | Simple curves teach even pressure. |
Line Consistency | Repeating shapes builds steady lines. |
Paste Flow | Simple shapes help you understand flow. |
Versatile and Fun
Okay, so hearts are simple, but they’re also incredibly versatile. You can use them as the main focus of your design, or incorporate them into larger patterns. Think tiny hearts scattered around your wrist, a bold heart on your palm, or a delicate heart outline around another design. They’re like the little black dress of henna designs – always stylish and adaptable.
Plus, who doesn’t love a heart? They're a universal symbol of love, affection, and good vibes. Whether you’re doing henna for a special occasion or just for fun, a heart design is always a great choice. It’s a way to express yourself and spread a little love wherever you go. So grab your henna and let’s start spreading some heart-shaped joy!
StepbyStep Guide to Creating Simple Henna Hearts
StepbyStep Guide to Creating Simple Henna Hearts
Gather Your Supplies
Alright, let's get down to business. Before you start drawing hearts all over yourself (and maybe your friends), it’s important to gather all the stuff you need. You don't need a fancy art studio or anything. A henna cone is the most important. Make sure it has a nice, fine tip for drawing. You’ll also want some paper for practice, a damp cloth to clean up any boo-boos, and maybe some designs or picture for inspiration. That's it! Simple, right? Think of it like prepping your kitchen before you start baking – you want everything within reach so that you won't get distracted.
I like to lay out my supplies on a clean surface, like a table, so everything is in one spot. This will save you from running all over the place when you're in the zone and creating your masterpiece.
Practice Makes Perfect (Almost)
Before you go all in on your skin, let's do some practice runs. Grab that paper you set aside and start sketching. The key is to get a feel for the henna cone. How much pressure should you apply? How fast should you move? The goal here is to create a steady flow of henna paste, so don't worry if your first hearts look a bit wobbly; it's all part of the process. Think of it like learning a new dance move; you wouldn’t expect to nail it on the first try, would you? So, practice your curves and points on paper until you feel comfortable. It’s better to make mistakes on paper than on your hand, trust me!
You can draw simple shapes like lines, dots, and circles – this will help you get comfortable with controlling the henna paste. Try drawing the letter "C" and "U" – these shapes are the base of the heart. Once you feel good, try putting those shapes together to form a heart.
Step | Action |
|---|---|
1 | Gather your henna cone, practice paper, and damp cloth. |
2 | Sketch basic shapes to get a feel for the cone. |
3 | Practice drawing hearts until comfortable. |
Drawing Your Heart on Skin
Okay, now for the fun part: drawing on your skin! Choose a spot that’s easy for you to reach and see. Your hand is a classic choice, but you can also try your wrist, ankle, or even your arm. Gently place the tip of the cone on your skin and start drawing the first curve of your heart. Remember to apply even pressure to keep the line smooth and consistent. Draw the second curve, making sure it meets the first one at the bottom. If you mess up, don't panic. Use that damp cloth to gently wipe it off and try again. It’s all about being patient and having fun with it. I like to think of it as giving myself a little temporary tattoo.
Once you have your heart outline, you can fill it in if you like, or leave it as an outline. You can also add some dots or small lines to decorate it. Let the henna paste dry for about 20-30 minutes, and then gently scrape off the dried paste. Try not to wash it off with water, or it will not stain properly. Avoid water for about 2-3 hours for a better stain. When the stain appears, it will initially be an orange color and will turn darker brown within 24-48 hours. Now you have your own beautiful, easy henna heart design!
Creative Ideas and Variations for Your Easy Heart Henna
Creative Ideas and Variations for Your Easy Heart Henna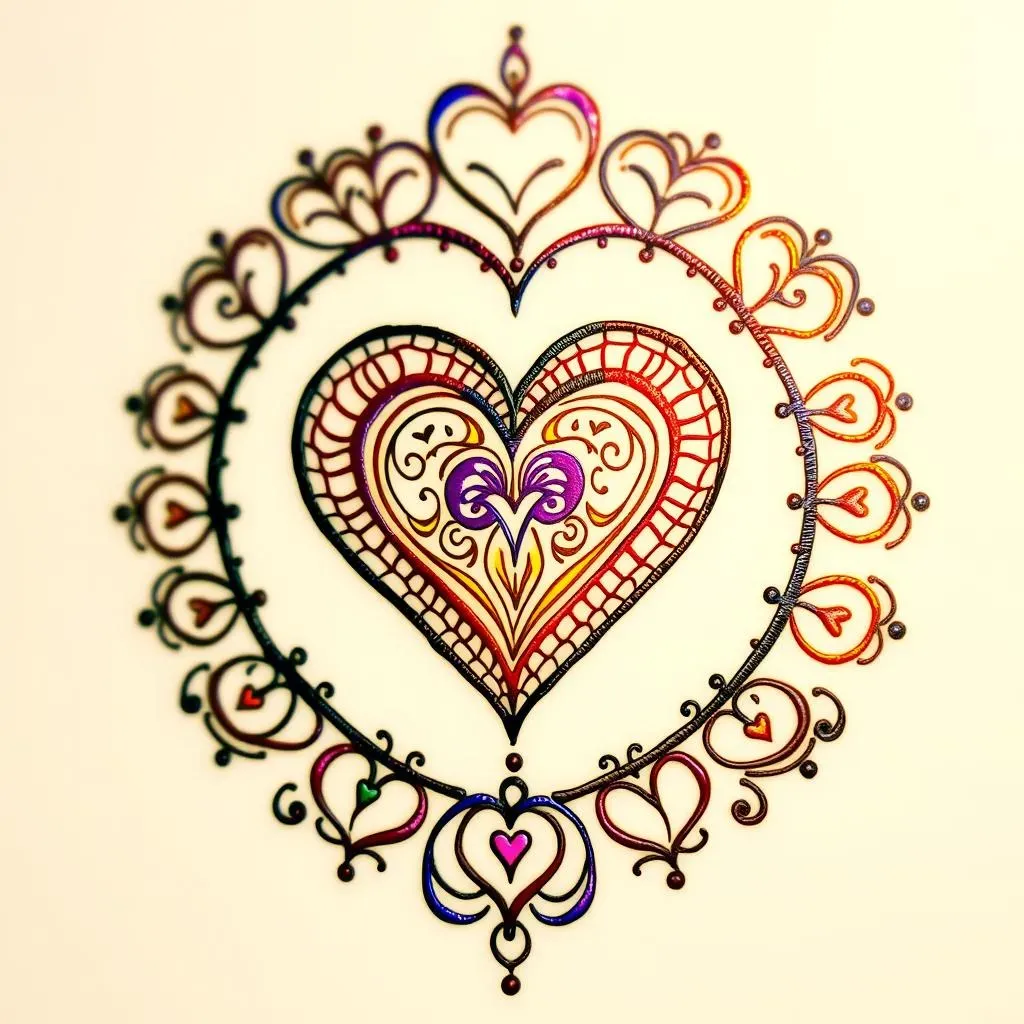
Heart Within a Heart
Okay, so you've mastered the basic heart, right? Now let's get a little fancy. How about a heart within a heart? Start by drawing a regular heart outline, and then draw a smaller heart inside it. You can fill in both hearts, or just outline them for a cool, layered effect. It’s like a surprise inside a surprise! I think this is a great way to add a bit of complexity without making it too hard. You can even add a third heart if you are feeling adventurous!
Think about it like Russian nesting dolls, each layer revealing something new. Try using different sizes for each heart to make it look more interesting, or try leaving some space between the hearts for a negative space effect. This technique is super versatile and allows for tons of personalization.
Heart Patterns and Borders
Why stop at just one heart? Let’s create a whole garden of them! Try drawing a row of tiny hearts along your wrist, or create a border of hearts around another design. You can even make a pattern by alternating different sizes or orientations. It's like creating your own little heart-filled world. I find this a particularly fun way to play around with spacing and repetition, it’s not just about drawing hearts but about how you arrange them.
You can even use dots and lines to connect the hearts together, creating a more intricate pattern. Think of it like designing your own wallpaper, but on your skin! A border of hearts can frame another design, or you can use them to create a bracelet or anklet effect. Let your creativity flow, and don’t be afraid to experiment with different patterns and arrangements.
Variation | Description |
|---|---|
Heart Within a Heart | Draw a smaller heart inside a larger one. |
Heart Rows | Create a line of hearts along your wrist or finger. |
Heart Borders | Use hearts to frame other designs. |
Adding Flourishes and Personal Touches
Now, let's add some personality to your heart designs. Try adding dots, swirls, or lines around your hearts. You can even add your initials or a special symbol. It’s like giving your heart a little extra sparkle. I like to use dots to add some texture and interest to my designs, and it’s a great way to fill any empty space. It’s really up to you how you want to decorate your hearts.
And don't forget to play around with the size and thickness of your lines. A thick outline will give your heart a bold look, while a thin outline will make it look more delicate. You can also try using a different colored henna for added contrast. The possibilities are endless, so have fun experimenting and making each heart design your own. Remember, it's all about expressing yourself and adding your own personal touch to your art.