Table of Contents
Ready to unleash your inner artist and create stunning henna designs? This article is your guide to the world of easy henna, perfect for beginners. Forget complicated patterns and frustrating mistakes – we'll show you simple, step-by-step henna designs that are easy to master. Whether you're a complete novice or just looking for some fresh, uncomplicated ideas, we've got you covered. We'll explore fundamental henna techniques, focusing on simple yet elegant designs. You’ll learn how to create beautiful patterns with ease, from basic floral motifs to intricate geometric shapes. We'll even share some inspiration for more advanced designs once you’ve mastered the basics. This isn't just about simple henna designs; it's about building confidence and having fun with this ancient art form. So grab your henna cone and let's embark on this creative journey together! Discover the joy of henna designs that are easy to create, and watch your confidence bloom as you master this beautiful tradition.
Simple Henna Designs for Beginners: Easy Mehndi Patterns
Simple Henna Designs for Beginners: Easy Mehndi Patterns
Getting Started: Your First Henna Designs
Let's dive right in! The beauty of henna is its accessibility. You don't need years of art school to create stunning designs. Start with simple shapes: dots, lines, and small leaves. Practice makes perfect, so don't be afraid to experiment on paper first. Get comfortable with the flow of the henna cone, and feel the pressure you need to create clean lines. Remember, it's all about building confidence and having fun. Think of it like learning to write; you started with simple letters, and now you can write whole sentences! Henna is similar; you'll start with simple shapes and soon be creating intricate patterns.
Once you're happy with your practice, move on to your hand or foot. Start with a small area, perhaps a single finger or a small section of your wrist. This allows you to get a feel for the henna's consistency and the time it takes to dry. Don't rush the process; slow and steady wins the race. It's better to have a few well-executed designs than many messy ones. Remember, you can always add more later if you want to expand your design.
Shape | Description | Tip |
|---|---|---|
Dots | Small, evenly spaced dots create a textured base. | Practice consistent pressure for uniform dot size. |
Lines | Straight or curved lines form stems and outlines. | Use a steady hand and controlled pressure. |
Leaves | Teardrop shapes create simple leaf patterns. | Vary the size and angle for a natural look. |
Simple Floral Designs
Flowers are a classic choice for henna, and they're surprisingly easy to create. Start with simple flower shapes like daisies or lotuses. These involve a central circle surrounded by petals. You can create petals using teardrop shapes or small, curved lines. Don't worry about making them perfectly symmetrical; a bit of imperfection adds to the charm. Think of it as your own unique signature. Focus on creating a pleasing flow and balance within your design. Experiment with different sizes and arrangements to find what you like best.
Once you’ve mastered simple flowers, you can add details like leaves and stems to create more complex designs. Remember, it's okay to start small and gradually build up your skills. You don't need to create a masterpiece on your first try. The process is just as important as the final product, so enjoy the journey of learning and creating! Remember to keep practicing, and you will be amazed at how quickly you progress.
- Practice basic shapes before attempting complex designs.
- Use stencils for added guidance.
- Start with small designs and gradually increase complexity.
Mastering Basic Henna Techniques for Easy Henna Designs
Mastering Basic Henna Techniques for Easy Henna Designs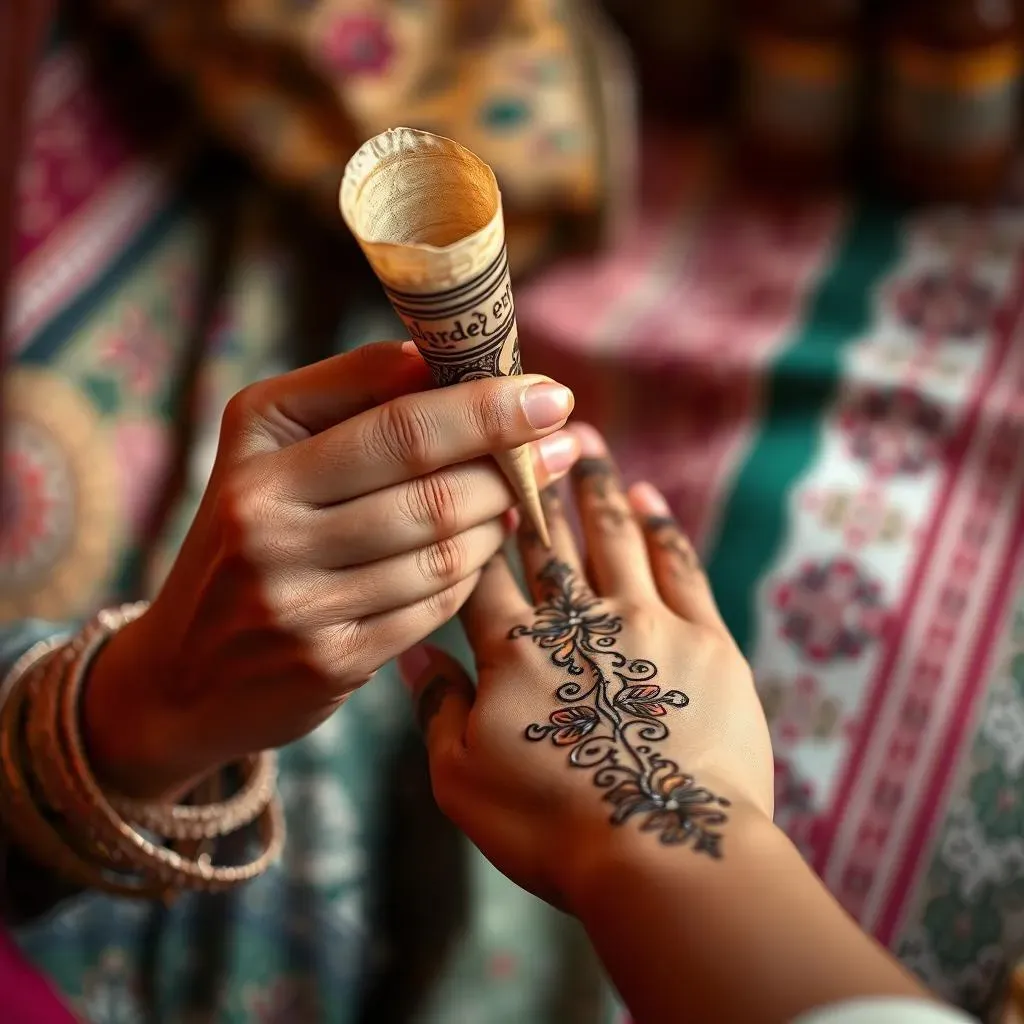
Mastering Basic Henna Techniques for Easy Henna Designs
So you've tackled simple shapes and flowers – fantastic! Now let's level up your henna game by focusing on technique. The key to beautiful, easy henna designs lies in mastering a few core skills. Think of it like learning to play an instrument; you wouldn't jump straight to a concerto, would you? You'd start with scales and chords. Henna is the same; you need to master the basics before tackling complex designs. First, practice controlling the henna cone's pressure. Consistent pressure is crucial for even lines and dots. Too much pressure, and your lines will be thick and uneven. Too little, and your lines will be faint and wispy. Experiment to find the sweet spot that works best for you. This takes time and practice, so be patient with yourself.
Next, focus on your line work. Try creating different types of lines: straight, curved, thick, and thin. Practice making smooth, continuous lines without lifting the cone too often. This will give your designs a more professional and polished look. Also, pay attention to the flow of your design. Your patterns should have a natural rhythm and balance. Don't be afraid to experiment with different arrangements and compositions. Remember, it's your artwork, so let your creativity flow! Practice different line weights and styles to create depth and interest in your designs.
Technique | Description | Tip |
|---|---|---|
Pressure Control | Consistent pressure creates even lines and dots. | Practice on paper until you achieve uniform results. |
Line Work | Smooth, continuous lines add elegance to your designs. | Use slow, deliberate movements and avoid jerky motions. |
Flow and Balance | Harmonious arrangement of elements creates a pleasing design. | Sketch your design beforehand to plan the composition. |
Another crucial aspect is understanding how henna dries. Henna takes time to set, so don't rush the process. Avoid touching or smudging the design until it's completely dry. This prevents the design from becoming blurred or smudged, ruining your hard work! The drying time depends on the henna's consistency and the ambient temperature. Generally, it will take at least a few hours for the henna to dry completely. If you're working on a larger design, you might want to work in sections to allow each area to dry before moving on. This will help prevent accidental smudging.
Finally, remember that practice is key! Don't get discouraged if your first few attempts aren't perfect. Keep practicing, and you'll see your skills improve quickly. Each design is a learning opportunity. Analyze your mistakes, and try to correct them in your next attempt. The more you practice, the more confident and skilled you'll become. Over time, you'll develop your own unique style and technique. Most importantly, have fun! Enjoy the creative process and the satisfaction of creating beautiful henna art. It’s a journey, not a race.
- Practice different line weights and styles.
- Experiment with various patterns and motifs.
- Don't be afraid to make mistakes – learn from them!
More Easy Henna Designs & Inspiration: From Simple to Stunning
More Easy Henna Designs & Inspiration: From Simple to Stunning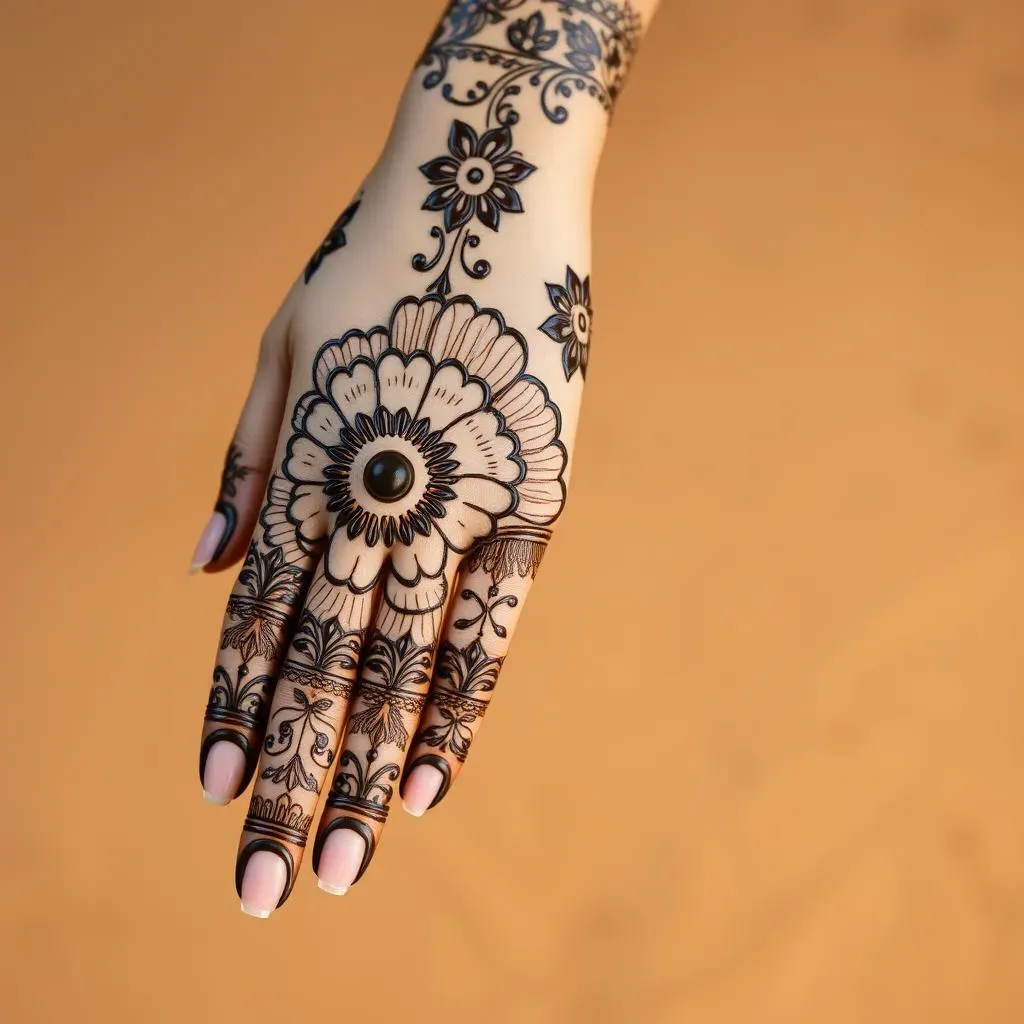
More Easy Henna Designs: Expanding Your Repertoire
Now that you've mastered the basics, let's explore some more intricate yet still manageable henna designs. Think of it as graduating from simple sentences to paragraphs! We'll move beyond basic shapes and flowers, incorporating more complex elements while still keeping things beginner-friendly. A great place to start is by combining the shapes you've already mastered. For example, you can create more elaborate floral designs by adding multiple layers of petals, leaves, and stems. Experiment with different arrangements and compositions to create unique and eye-catching patterns. Don't be afraid to get creative and let your imagination run wild! Remember, even small additions can make a big difference.
Consider incorporating geometric patterns into your designs. Simple geometric shapes like triangles, squares, and circles can add visual interest and structure. You can use these shapes to create borders, fill in spaces, or create the foundation for more complex designs. Remember, the key is to start small and build up gradually. Don't try to create an overly complex design all at once; instead, focus on mastering one new element at a time. This will help you to avoid frustration and build confidence as you progress. Remember, the goal is to have fun and create beautiful henna art!
Design Element | Description | Tip |
|---|---|---|
Layered Petals | Overlapping petals create depth and dimension. | Use varying sizes and shades for a 3D effect. |
Geometric Patterns | Incorporate simple shapes for structure and visual interest. | Start with basic shapes and gradually increase complexity. |
Combined Motifs | Combine flowers, leaves, and geometric shapes for unique designs. | Plan your design beforehand to ensure balance and flow. |
Another fantastic way to expand your repertoire is by exploring different cultural styles. Many cultures have unique henna traditions with distinct patterns and motifs. Researching these different styles can provide a wealth of inspiration and help you develop your own unique style. For example, you could explore the intricate paisley patterns of Indian Mehndi or the elegant floral designs of Arabic henna. Don't be afraid to borrow ideas and adapt them to your own preferences. The beauty of henna is its versatility; you can create designs that are both traditional and modern.
Remember, the internet is a treasure trove of henna inspiration. Browse through online galleries, Pinterest boards, and Instagram accounts to find designs that you love. Don't be afraid to experiment and try new things. The more you practice, the more confident you'll become in your ability to create beautiful and intricate designs. The key is to have fun and enjoy the creative process. Henna is a beautiful art form, and it's a wonderful way to express your creativity and individuality. So go ahead, experiment, and create something truly stunning!
- Research different henna styles from various cultures.
- Use online resources for inspiration and tutorials.
- Experiment with different color variations and techniques.